New-Nano: automating Windows Nano Server lab builds with PowerShell

I wrote this function to automate Nano Server lab builds into Hyper-V. You need to supply the “Windows Server 2016 Technical Preview 5” ISO, which you can get here or here. My script is based partially on ideas presented in the Microsoft TechNet article “Getting Started with Nano Server“.

You will need to have Hyper-V on your computer, have a Hyper-V switch on a network that has DHCP running somewhere (if you have a switch in Hyper-V defined as “External”, this should work fine). You will also need to supply a working directory.

New-Nano copies the required files from the ISO, runs Microsoft’s cmdlet New-NanoServerImage to build a Hyper-V disk image, creates a new VM from that disk image, starts the VM, and gets network information from the VM. The function then runs an example PowerShell Session to demonstrate connectivity to the new Nano VM. Total build time in my tests is a little over three minutes.

If you look to the bottom of the script, you will see an example of how to call the New-Nano function.

Further refinements would be to install features and packages to the Nano, and to do domain joins. Please note that this should only be used for a lab environment because the administrator password is in plaintext. If this was going into a production environment, you would want to encode it.

Enjoy. Please try it out and leave a comment.

Start-Transcript -Path "C:\Lab\NewNano.txt"
function New-Nano
{
    [CmdletBinding()]
    Param
    (
        # Path to the Windows Server 2016 ISO
        [Parameter(Mandatory=$true)]
        $ImagePath,

        # Working Directory
        [Parameter(Mandatory=$true)]
        $WorkingDir,

        # Admin Password
        [SecureString]
        $AdminPassword = (ConvertTo-SecureString -AsPlainText "Password1" -Force),

        # Hyper-V Switch Name
        [String]
        $NetworkSwitch = "External",

        # Nano VM Name
        [String]
        $Name = "nano" + $(Get-Random -Minimum 1000 -Maximum 9999),
        
        # Processor Count
        $ProcessorCount = 1,

        # Memory Startup Bytes
        $MemoryStartupBytes = 512MB
    )

    Process
    {
    # ref: https://technet.microsoft.com/en-us/library/mt126167.aspx
    
    $VirtualHardDiskPath = $(Get-VMHost).VirtualHardDiskPath
    $VirtualMachinePath = $(Get-VMHost).VirtualMachinePath
    $NewNanoPath = $VirtualHardDiskPath + $Name + ".vhdx"
    $StartingDir = (Get-Location).Path
    $MountObject = Mount-DiskImage -ImagePath $ImagePath -PassThru
    $MountDriveLetter = ($MountObject | Get-Volume).DriveLetter + ":"
    $NanoMount = $MountDriveLetter + "\NanoServer\"

    # copy the NanoServer dir to the working dir
    $NanoDir = $WorkingDir + "NanoServer\"
    Copy-Item -Path $NanoMount -Destination $NanoDir -Recurse -Force

    Set-Location $NanoDir

    Import-Module .\NanoServerImageGenerator -Verbose

    # create the VHD
    $NewNanoResult = New-NanoServerImage -DeploymentType Guest -Edition Standard -MediaPath $MountDriveLetter -BasePath .\Base -TargetPath $NewNanoPath -EnableRemoteManagementPort -ComputerName $Name -AdministratorPassword $AdminPassword

    # new VM from the VHD
    New-VM -Name $Name -VHDPath $NewNanoPath -MemoryStartupBytes $MemoryStartupBytes -SwitchName $NetworkSwitch -BootDevice VHD -Generation 2 -Path $VirtualMachinePath  |
    Set-VM -DynamicMemory -ProcessorCount $ProcessorCount -Passthru -AutomaticStopAction ShutDown -AutomaticStartAction Nothing 

    # finish up.
    $MountObject | Dismount-DiskImage
    "Starting $Name"
    Start-VM $Name

    while ((Get-VM $Name).State -ne "Running")
        {Start-Sleep 5}
    "$Name is Running."

    while ((Get-VM $Name).NetworkAdapters.Status[0] -ne "Ok") 
        {Start-Sleep 5}
    "Network adapter reporting Ok."

    $vm = Get-VM $Name
    $vm.NetworkAdapters | select VMName, SwitchName, Status, IPAddresses

    "Demonstrate that PowerShell Session works"
    $AdminUser = "$Name\Administrator"
    $cred = New-Object -Typename System.Management.Automation.PSCredential  -Argumentlist $AdminUser, $AdminPassword
    $pss = New-PSSession -ComputerName $Name -Credential $cred
    Invoke-Command -Session $pss -ScriptBlock {Get-Service | where Status -EQ "Running"| Format-Table} 
    Remove-PSSession $pss

    # return to original directory
    Set-Location $StartingDir
    }
}

$NewNanoParams = @{
    ImagePath = "C:\ISOs\en_windows_server_2016_technical_preview_5_x64_dvd_8512312.iso";
    WorkingDir = "C:\Lab\";
    AdminPassword =  (ConvertTo-SecureString -AsPlainText "Password1" -Force);
    NetworkSwitch = "External"
    Name = "LabNano" + (Get-Random -Minimum 100 -Maximum 999);
    ProcessorCount = 1;
    MemoryStartupBytes = 512MB
    }

New-Nano @NewNanoParams

Stop-Transcript


Returning custom objects in PowerShell, simplified

I’ve stumbled upon this simplified technique to return custom objects in my PowerShell functions.

My first take on it was this, but I’ve simplified it. In this simplified variation, you just create and return the object in the same hash. For example:

[PsCustomObject]@{
    ComputerName = $ComputerSystem.DNSHostName;
    Domain = $ComputerSystem.Domain;
    ProcessCount = $ProcessCount;
    }

This is a hash, as you probably have seen before, but the [PsCustomObject] is what makes it a custom object.

And in context of a function:

# Example Function
function Get-SystemInfo {

    # Prepare the info
    $OS = Get-CimInstance -ClassName Win32_OperatingSystem # for FreePhysicalMemory, Caption, PSComputerName, SystemDrive
    $LoadPercentage = (Get-CimInstance -ClassName Win32_Processor).LoadPercentage
    $ProcessCount = (Get-Process).Count
    $SystemDrive = Get-CimInstance -ClassName Win32_LogicalDisk -filter "Name = '$($OS.SystemDrive)'" 
    $ComputerSystem = Get-CimInstance -ClassName Win32_ComputerSystem

    # Return the properties in a custom object
    [PsCustomObject]@{
        ComputerName = $ComputerSystem.DNSHostName;
        Domain = $ComputerSystem.Domain;
        FreePhysicalMemory = "{0:n0}" -f ($OS.FreePhysicalMemory /1KB) + " MB";
        OS = $OS.Caption;
        LastBootUpTime = $OS.LastBootUpTime;
        LoadPercentage = $LoadPercentage;
        ProcessCount = $ProcessCount;
        SysVolFree = "{0:n1}" -f ($SystemDrive.FreeSpace /1GB) + " GB"
        }
     
    }

# Example Usage

# Using the results, put them into an object "$Result"
$Result = Get-SystemInfo

# Access the values inside the object
$Result.LastBootUpTime

Get-Subnet, a PowerShell advanced function

I wrote a PowerShell advanced function “Get-Subnet” to return a subnet mask for a given bit or bit range.

The cmdlet, with embedded help, including examples:

<#
.Synopsis
   Returns a subnet mask for a given bit or bit range.
.DESCRIPTION
   For a given number of bits, or range of bits, returns the equivilant subnet mask(s) and number of available hosts in that subnet.
   Returns NetworkBits, SubnetMask, NumberOfHosts for each bit.
   NetworkBits is provided for completeness, in the case of multiple objects returned. 
   SubnetMask string is useful for situations where you know network bits and want to set a subnet mask on a network card. 
   NumberOfHosts is useful for understanding implications of using a selected number of bits.
.EXAMPLE
   PS C:\>Get-Subnet

Returns:
>   NetworkBits SubnetMask      NumberOfHosts
>   ----------- ----------      -------------
>             8 255.0.0.0            16777214
>             9 255.128.0.0           8388606
>            10 255.192.0.0           4194302
>            11 255.224.0.0           2097150
>            12 255.240.0.0           1048574
>            13 255.248.0.0            524286
>            14 255.252.0.0            262142
>            15 255.254.0.0            131070
>            16 255.255.0.0             65534
>            17 255.255.128.0           32766
>            18 255.255.192.0           16382
>            19 255.255.224.0            8190
>            20 255.255.240.0            4094
>            21 255.255.248.0            2046
>            22 255.255.252.0            1022
>            23 255.255.254.0             510
>            24 255.255.255.0             254
>            25 255.255.255.128           126
>            26 255.255.255.192            62
>            27 255.255.255.224            30
>            28 255.255.255.240            14
>            29 255.255.255.248             6
>            30 255.255.255.252             2

   With no parameters, the command lists subnet masks for bit range 8 to 30.
.EXAMPLE
   PS C:\>Get-Subnet -MinBits 20 -MaxBits 24

Returns:
>   NetworkBits SubnetMask    NumberOfHosts
>   ----------- ----------    -------------
>            20 255.255.240.0          4094
>            21 255.255.248.0          2046
>            22 255.255.252.0          1022
>            23 255.255.254.0           510
>            24 255.255.255.0           254
   
   Return a specific range of subnet masks.
.EXAMPLE
   PS C:\>$a = (Get-Subnet -Bits 20).SubnetMask
   PS C:\>Write-Host "20 bit Subnet mask is $a"

   Returns:
>  20 bit Subnet mask is 255.255.240.0

   Store a specific subnet mask to a variable.
#>

function Get-Subnet

{
              [CmdletBinding(DefaultParameterSetName='Parameter Set 1')]
              Param
              (
                [Parameter(ParameterSetName='Parameter Set 1')]
                $Bits,
          
                [Parameter(ParameterSetName='Parameter Set 2')]
                $MinBits,

                [Parameter(ParameterSetName='Parameter Set 2')]
                $MaxBits

              )
    if ($Bits -ne $null) {
        $MinBits = $Bits
        $MaxBits = $Bits
        }
        else {
            if ($MinBits -eq $null) {
                $MinBits = 8
                }
            if ($MaxBits -eq $null) {
                $MaxBits = 30
                }
            }

    foreach ($i in ($MinBits..$MaxBits)) 
    {
        $binary = ([string]"1" * $i).PadRight(32,"0")

        $InvertedBinary = ([string]"0" * $i).PadRight(32,"1")

        $NumberOfHosts = [convert]::ToInt32($InvertedBinary,2) -1 

        $Oct1 = [string][convert]::ToInt32($binary.Substring(0,8),2)
        $Oct2 = [string][convert]::ToInt32($binary.Substring(8,8),2)
        $Oct3 = [string][convert]::ToInt32($binary.Substring(16,8),2)
        $Oct4 = [string][convert]::ToInt32($binary.Substring(24,8),2)

        $SubnetMask = $Oct1 + "." + $Oct2 + "." + $Oct3 + "." + $Oct4

        [PsCustomObject]@{
            "NetworkBits" = $i; 
            "SubnetMask" = $SubnetMask; 
            "NumberOfHosts" = $NumberOfHosts
            }
        } 

}

The XOR Cipher in PowerShell

DISCLAIMER: This is presented for educational purposes only. It is not intended for use as production cryptography. The example here is not secure and is vulnerable to multiple attacks.

Inspired by my son’s recent interest in ciphers, I decided to write a basic XOR cipher in PowerShell. Given your plaintext and key, the script returns the ciphertext.

What does it do?
The plaintext and the key are strings. If the key is shorter then the plaintext, then we repeat the key until it’s as long as the plaintext. A string is made up of bytes. And bytes are made up bits. For each bit in the plaintext, we do an Exclusive Or (XOR) Operation with the coresponding bit in the repeated key. The result is stored in the ciphertext.

What is Exclusive Or? https://en.wikipedia.org/wiki/Exclusive_or

Exclusive Or is an operation that outputs TRUE when the inputs differ.
For example:

Plaintext  01010000
Key        01101011
XOR-----------------
Ciphertext 00111011

A nice feature of XOR is that it is easly reversable. If we XOR the key with the ciphertext, we get the plaintext back.

The code:

function encode($plaintext, $key)
    {
    $cyphertext = ""
    $keyposition = 0
    $KeyArray = $key.ToCharArray()
    $plaintext.ToCharArray() | foreach-object -process {
        $cyphertext += [char]([byte][char]$_ -bxor $KeyArray[$keyposition])
        $keyposition += 1
        if ($keyposition -eq $key.Length) {$keyposition = 0}
        }
    return $cyphertext
    }

PowerShell Hex Functions

I wrote some basic functions to convert a string to hexadecimal, to convert hexadecimal to a string. Also a function to dump a string to it’s component bytes, listing on each line, the character, it’s ASCII code in hexadecimal, and ASCII code in decimal. Example output:

PS C:\> StringToHex "This is an example!@#"
5468697320697320616E206578616D706C65214023
PS C:\> HexToString "4861726B212053686F77206D6520616E206578616D706C653F3F"
Hark! Show me an example??
PS C:\> HexDump "So how is this?"
S 0x53 83
o 0x6F 111
  0x20 32
h 0x68 104
o 0x6F 111
w 0x77 119
  0x20 32
i 0x69 105
s 0x73 115
  0x20 32
t 0x74 116
h 0x68 104
i 0x69 105
s 0x73 115
? 0x3F 63

The code. They are basic functions, not Advanced Functions, so nothing fancy.

function StringToHex($i) {
    $r = ""
    $i.ToCharArray() | foreach-object -process {
        $r += '{0:X}' -f [int][char]$_
        }
    return $r
    }

function HexToString($i) {
    $r = ""
    for ($n = 0; $n -lt $i.Length; $n += 2)
        {$r += [char][int]("0x" + $i.Substring($n,2))}
    return $r
    }

function HexDump($i) {
    $i.ToCharArray() | foreach-object -process {
        $num = [int][char]$_
        $hex = "0x" + ('{0:X}' -f $num)
        "$_ $hex $num"
        }
    }

PowerShell function to calculate data transfer time

This PowerShell function will calculate how long it will take to transfer a given number of bytes at a given speed (in bits per second). Optionally, you can specify transfer overhead, which defaults to ten percent.

Example Usage

PS C:\> Get-TransferTime -FileSize 4.4gb -Speed 2mb


Days         : 0
Hours        : 5
Minutes      : 0
Seconds      : 22
TotalDays    : 0.208587962962963
TotalHours   : 5.00611111111111
TotalMinutes : 300.366666666667
TotalSeconds : 18022

The Function

<#
.Synopsis
Data transfer time calculation.
.DESCRIPTION
Calculate how long it would take to transfer a given number of bytes at a given speed.
.PARAMETER FileSize
File Size in bytes. Can specify with GB, MB, etc.
.PARAMETER Speed
Transfer speed in bits. Can specify with GB, MB, etc.
.PARAMETER OverheadPercent
Transfer overhead percent. Defaults to 10.
.EXAMPLE
Get-TransferTime -FileSize 4.4gb -Speed 2mb
.EXAMPLE
Get-TransferTime -FileSize 50mb -Speed 10mb -OverheadPercent 6
.NOTES
Ken Bradley, 2015-12-10
#>
function Get-TransferTime
{
    [CmdletBinding()]
    [Alias()]
    [OutputType([int])]
    Param
    (
        [Parameter(Mandatory=$true,
                   ValueFromPipelineByPropertyName=$true,
                   Position=0)]
        [double]$FileSize, # bytes, can specify GB, MB, etc

        #Speed help!
        [Parameter(Mandatory=$true,
                   ValueFromPipelineByPropertyName=$true,
                   Position=1)]
        [double]$Speed, # bits, can specify GB, MB, etc

        [Parameter(Mandatory=$false,
                   ValueFromPipelineByPropertyName=$true,
                   Position=2)]
        [double]$OverheadPercent=10
        )

    # Scale percent so 100% = 1.0
    $ScaledPercent = 1 + ($OverheadPercent / 100)
    # Calculate seconds
    $Result = ($FileSize * 8 * $ScaledPercent) / $Speed

    # Output the result nicely formated
    New-TimeSpan -Seconds $Result | Format-List -Property Days, Hours, Minutes, Seconds, TotalDays, TotalHours, TotalMinutes, TotalSeconds
    }

[EDIT: Previously, there was an error with OverheadPercent being excluded from the calculation. It has been added back. Thanks to JG for catching this.]

How to output objects from your own PowerShell functions

This example of PowerShell code shows how to output objects from your own functions. The basic tasks you do to accomplish this in your function are:

  1. Assemble the values into a hash table
  2. Create an object using that hash table
  3. Output the object

Once you do this, then you can treat your output as you would any other object in PowerShell.

  1. Assemble the values into a hash table
    • See my example below, it is the lines like $Properties =  @{…}
    • More info at about_Splatting
  2. Create an object using that hash table
    • See my example, the line starting with $Object = New-Object…
  3. Output the object
    • Simply Write-Output $Object
# Example Function
function Get-SystemInfo {

    # Prepare the info
    $OS = Get-CimInstance -ClassName Win32_OperatingSystem # for FreePhysicalMemory, Caption, PSComputerName, SystemDrive
    $LoadPercentage = (Get-CimInstance -ClassName Win32_Processor).LoadPercentage
    $ProcessCount = (Get-Process).Count
    $SystemDrive = Get-CimInstance -ClassName Win32_LogicalDisk -filter "Name = '$($OS.SystemDrive)'" 
    $ComputerSystem = Get-CimInstance -ClassName Win32_ComputerSystem

    # Prepare the properties in a hash table
    $Properties = @{
        ComputerName = $ComputerSystem.DNSHostName;
        Domain = $ComputerSystem.Domain;
        FreePhysicalMemory = "{0:n0}" -f ($OS.FreePhysicalMemory /1KB) + " MB";
        OS = $OS.Caption;
        LastBootUpTime = $OS.LastBootUpTime;
        LoadPercentage = $LoadPercentage;
        ProcessCount = $ProcessCount;
        SysVolFree = "{0:n1}" -f ($SystemDrive.FreeSpace /1GB) + " GB"
        }
    
    # Create an object using the properties
    $Object = New-Object -TypeName PSObject -Property $Properties

    # Output the object
    Write-Output $Object     
    }

# Example Usage

# Using the results, put them into an object "$Result"
$Result = Get-SystemInfo

# Access the values inside the object
$Result.LastBootUpTime

Exploring COM with PowerShell

What is COM?

I hope to explain how to use COM object in PowerShell. A COM object is an interface into an application or Windows. For example the Excel COM object will allow you to work with an Excel spreadsheet, or the iTunes COM object will allow you to control iTunes via PowerShell. It’s not always pretty, or easy. If you have a built-in PowerShell command, use it. (For example Export-Csv is easier then using Excel to work with CSV.)

Getting Started

Maybe you don’t know the exact name of the COM object you want to use? Sometimes a quick web search will uncover it. If not, this bit of PowerShell code will list the COM objects available on your machine.

Get-ChildItem HKLM:\Software\Classes -ErrorAction SilentlyContinue | Where-Object { $_.PSChildName -match '^\w+\.\w+$' -and (Test-Path -Path "$($_.PSPath)\CLSID") } | Select-Object -ExpandProperty PSChildName

(via PowerShell Magazine)

The list may take a few minutes. I see “iTunes.Application” in there. That’s what I want.

Using the COM Object

I tell PowerShell to create a new object:

$Itunes = New-Object  -ComObject iTunes.Application

To see what we can do with this object, execute the above then type this PowerShell command (gm is the alias for Get-Member):

$Itunes | gm

This tells me the methods and properties supported by this COM object. Browsing through this will reveal more details, if you need it. “$itunes.LibraryPlaylist.Tracks” is all the tracks. And

$itunes.LibraryPlaylist.Tracks[1] | gm

shows you the methods and properties relating to tracks. (I use the “[1]” to make the listing faster. Since tracks is an array of all the tracks in iTunes, this could take a long time to list all the methods and properties, if you have many tracks. Since all tracks have the same member names (like Artist, Year, Name, etc), I’ll just list the members from the first track.)

So for example, if you wanted iTunes to play, you could do:

$Itunes.play()

Or this little script goes through all your tracks and counts the artists in your collection:

$Itunes = New-Object  -ComObject iTunes.Application
# Get a list of artists from tracks
$Artist = @()
foreach ($Track in  $Itunes.LibraryPlaylist.Tracks)
    {
    $Artist += $Track.Artist
    }
# eliminate duplicates in the list
$artist = $artist | sort -Unique 
Write-Host "$($artist.count) artists found in your iTunes collection"

PowerShell script to generate a Rainmeter skin

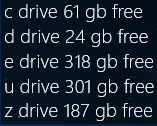
I recently discovered Rainmeter, a desktop customization tool that lets you use some really nice looking gadgets. I wanted a simple skin to show disk free space.

rainmeterskin

I have five volumes, I could have manually written a custom skin. (Rainmeter skins are INI files.) That would involve setting a measure section for each disk and a in another section define how the output looks. Or I could take the much more time consuming task of writing a PowerShell script to iterate through my disks and write the skin INI file.

Download RainmeterDisksSkin.ZIP

The body of the script:

# Stop on the first error
$ErrorActionPreference = "Stop"

$RainmeterPath = [environment]::getfolderpath("mydocuments") + "\Rainmeter\Skins\"
$SkinName = "Kenward"
$FileName = "disks.ini"

If (-Not (Test-Path $($RainmeterPath + $SkinName))) {
    Set-Location $RainmeterPath
    mkdir $SkinName
    }

$OutFile = $RainmeterPath + $SkinName + "\" + $FileName
$Disks = Get-Volume | where {$_.DriveType -eq "Fixed"} | sort -Property DriveLetter
$Disks

$Header = @"
[Rainmeter]
Update=1000

[Variables]
vFontName=Segoe UI Light
vFontColor=255,255,255,255
vSolidColor=0,0,0,128
vFontSize=14
vStringCase=Lower
"@

$MeterCommon = @"
`n[MeterDriveInfo]
NumOfDecimals=0
FontFace=#vFontName#
FontSize=#vFontSize#
Meter=String
X=0
Y=0
FontColor=#vFontColor#
SolidColor=#vSolidColor#
AntiAlias=1
AutoScale=1
StringCase=#vStringCase#
"@

Out-File -FilePath $Outfile -InputObject $Header

foreach ($Disk in $Disks) {
    Out-File -FilePath $Outfile -Append -InputObject "`n[MeasureFreeDiskSpace$($Disk.DriveLetter)]"
    Out-File -FilePath $Outfile -Append -InputObject "Measure=FreeDiskSpace"
    Out-File -FilePath $Outfile -Append -InputObject "Drive=$($Disk.DriveLetter):"
    Out-File -FilePath $Outfile -Append -InputObject "UpdateDivider=5"
    }

Out-File -FilePath $Outfile -Append -InputObject $MeterCommon

for ($i = 0; $i -le $Disks.count - 1; $i++)
    { 
    if ($i -eq 0) {
        $Output = "MeasureName=MeasureFreeDiskSpace$($Disks[$i].DriveLetter)"
        $TextValue = "text = ""$($Disks[$i].DriveLetter) drive %1B free"
        }
        else {
            $Output = "MeasureName$($i+1)=MeasureFreeDiskSpace$($Disks[$i].DriveLetter)"
            $TextValue += "#crlf#$($Disks[$i].DriveLetter) drive %$($i + 1)B free"
        }
    Out-File -FilePath $Outfile -Append -InputObject $Output
    }

Out-File -FilePath $Outfile -Append -InputObject $($TextValue + '"')