How to Create an API Token for Proxmox VE

“Proxmox Virtual Environment is a complete, open-source server management platform for enterprise virtualization. It tightly integrates the KVM hypervisor and Linux Containers (LXC), software-defined storage and networking functionality, on a single platform. With the integrated web-based user interface you can manage VMs and containers, high availability for clusters, or the integrated disaster recovery tools with ease.” from Proxmox.com

You can authenticate to the Proxmox API using a user/password or using an API token. An API token is useful because it let’s you fine tune permissions to the task at hand, and if you need to revoke a token, it won’t impact the user that it’s associated with. Also, I liked the simplicity of using the same authentication header with each API call. With user/password authentication, I didn’t want to manage a ticket cookie over multiple API calls.

This blog post documents how to create an API token.

  1. Go to Datacenter > Permissions > Groups
    • Click the Create button to create a new group, call it for example “provisioning”
  2. Go to Datacenter > Permissions > Users
    • Click the Create button to create a new user
    • User name: for example “provisioner”
    • Realm: “Proxmox VE authentication server” (or you can select “Linux” but you will need to set the password on the Linux command line)
    • Group: select the group you created earlier
    • Click Add
  3. Go to Datacenter > Permissions
    • This will set permissions for the group, click Add
    • Path: To allow the permissions to be applied anywhere in Proxmox, select “/”, or to refine where they get applied, select that specific path.
    • Select Role, for example “Administrator”, or a more restrictive role depending on what you intend to do.
  4. Go to Datacenter > Permissions > API Tokens, to create the actual token
    • Click Add
    • Select the User you created above
    • Token ID: Type a name for the token, for example “prov”
    • When you click Add, the Token Secret will be displayed. It will only be displayed once, at creation, so copy it to a secure location. It is a string in the form of 36 random-ish characters.

vi cheatsheet

Get the PDF here.

The bare minimum vi.

How to open a new or existing file in vi

vi filename

File navigation

Use [Page Up] , [Page Down]  to page through the file. Use the arrow keys to move the cursor.

Command mode and insert mode

When you first start vi, you are in command mode

To switch to insert mode

i

Once in insert mode, you can type in your text file.

To switch from insert mode to command mode

[ESC]

Command mode

Quit without saving changes

:q!

Quit

:q

Write (save)

:w

Write a copy of the file to another name

:w filename

Search for a string (replace “search” with the string you are searching for)

:/search

Global search and replace (replace “search” and “replace” with the strings you are searching and replacing)

:%s/search/replace/

The Script Development Process

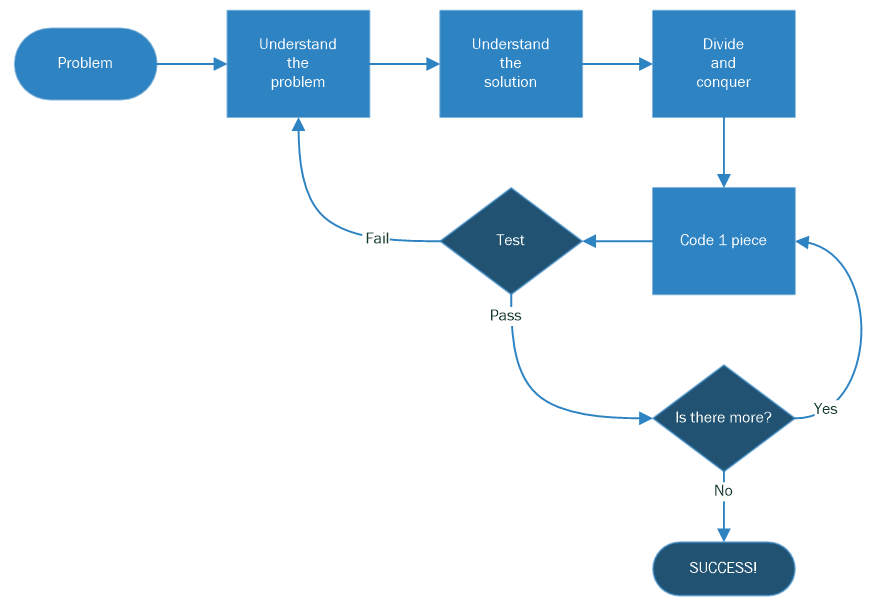
Script Development Process

This script development process is an iterative process designed to help you rapidly write quality scripts. The principle is to understand and define the problem. Break up your solution into small steps. Code one small step at a time. Test each small step and get it right before moving on to the next piece. Repeat these steps until you have your solution. All while managing your time.

When is automation the solution?

The benefits of automation are primarily to save time and to decrease errors associated with manual actions. You will need to make the calculation if a script will benefit your situation. How many hours will it take for you to write these script? How many hours of manual work will the script save?

Continue reading “The Script Development Process”

Thick and Thin, Eager and Lazy: vSphere Disk Provisioning types

When adding disks to a VM in vSphere you may have seen “Disk Provisioning type” and wondered what the benefits of each type were. Disk performance and disk space used are what governs the decision to use each type.

The 3 disk provisioning types are “Thick Provision Lazy Zeroed”, “Thick Provision Eager Zeroed”, “Thin Provision”. The things I want to explain are the difference between “thick” and “thin” disk and the difference between “eager” and “lazy” zeroing.

Continue reading “Thick and Thin, Eager and Lazy: vSphere Disk Provisioning types”

8 Track Pi

8trackPiI’ve repurposed an 8 track tape into a case for my Raspberry Pi. Perfect for my XBMC Pi.

If you are doing this yourself, a few notes. The tape shell is in two parts. Try to find one that is clipped together rather then fused.  Look at the holes on the bottom of the tape to see what I mean. I had to dremal out some interior pins to make room for the Pi. Also had to cut a small hole in the side for the power. Please be careful!

Anyway, I love the juxtaposition of an ethernet cable going into an 8 track tape.

Creating music on Android

Lately, I’ve been looking into music composition apps on the Android. I’ve found a few that I like. Electrum is a straight-forward drum machine. I like that it is very similar to typical drum machine programming, so if you are familiar with that, then it will be easy to pick up. It comes with some built-in drum sounds, lets you download some, or add your own. Reactable (see screenshot to the left) is a fairly experimental composition tool High learning curve. You connect samplers, loops, sequencers, delay effects, etc, to make music. I can see making decent electronic music with this, but I’m still learning. I’m also experimenting with NodeBeat (fun and easy to use but creatively limited) and SPC (looks like a loop sequencer mostly but I haven’t spent much time with this one). I’ll probably write more on these later after I’ve had a chance to use them some more. Maybe even post some MP3s.